May 15, 2016 | Captain OCD, Daily, General
In his spare time on some weekends, Captain OCD works at what used to be a golf course but is now beautiful gardens. Before the golf course, it was a dairy farm. He could not be having more fun. These 90+ acres are about one-third wetlands and the property is not visible from a main highway or any other regularly traveled street, although it just on the other side of thin strip of big trees between the highway and the property. Few people know that this beautiful oasis exists. It is one guy’s vision and hard work (the owner of the property), and some of Captain OCD’s work and ideas. It will always be a work in progress, but it’s available now for weddings and special events.
General grounds in no particular order, up above the valley bottom:


It’s pine-candling season, but Captain OCD’s full time job leaves little time for this:


Looking down toward the valley bottom:

(more…)
May 15, 2016 | How to
Edit May 15, 2016: This was first published on April 28, 2008. It looks like parts 1 and 3 of this series were lost when this website was jacked and I had to recreate it. If I had the posts, they’d be on hard drives long since smashed to bits. In the original incarnation of this how-to, there are more steps between the re-numbered step 8 here and step 9 in part 2. The finished product is a little less shiny, but it looks and works the same. We’ve had to replace the ball valve at least three times because we often don’t shut the water off soon enough for our first freeze of the winter and they obviously don’t make brass valves like they used to. Or, it takes us more than three times to learn a lesson.
If you’re concerned that a fire hydrant in your yard will confuse firefighters in the event of a house fire, read this and know that you are insulting their intelligence. This no-longer-functioning hydrant is about 100 feet up our driveway. If a fire truck pulls up that driveway to our house and thinks the hydrant with a garden hose coming out of the front of it is where he or she needs to attach his or her giant fire hose, we’ve got bigger problems to worry about. After the small fire linked-to above, the firefighters noticed the hydrant next to the steps leading to our front door (it was dark): “Oh, cool. Hey, come and look at this.” I asked if there were any way this sort of garden decoration would be confusing to a real firefighter. Oh, how they laughed.
I don’t know where one would get an old fire hydrant. If only there were a way to search for such information. Captain OCD got this off of an old commercial job site where they tore out almost all of the existing infrastructure to make way for a new shopping complex. He wouldn’t tell me what other sorts of heavy duty commercial parts were in the scrap heap because he didn’t want to haul home even more crap that I might someday use for something.
1. Gut the hydrant. I don’t know what the guts looked like because someone decided that he could disembowel it without any helpful hints from me, but I hear they were extremely heavy.

2. Assemble your tools and strip the big chunks of loose paint. We were going to have the whole thing bead blasted. Like that was ever going to happen, so I used an assortment of wire brushes and wheels so it wouldn’t be yet one more unfinished project taking up space. I decided that I wanted to honor the noble heritage of the old hydrant by proudly displaying its many layers of experience instead of stripping them away, like something to be ashamed of. And I was too lazy to strip the whole thing down to bare cast iron. We don’t have a shop, so I cleared away most of the hay in the carport because it’s open and covered.


3. The top was so encrusted with a sandy cement-like covering that there was no hint that any of these letters were underneath it all. It came off pretty easily with this, on the end of a drill (that’s an arbor in the middle so it would fit in the drill). Be careful if you’re fond of your skin because this will mess you up.

4. When you go to the hardware store to buy a wire wheel sturdy enough to get all those layers of life off, don’t be fooled by the seductive promise of up to ten times more use out of this piece of crap with the orange bits. It costs twice what a wire wheel costs, so it must be better, right? It will last 100 times as long because it does nothing more than caress the old paint.

5. For the bolts (and the caps, above), I used a wire wheel on a bench grinder. We’ll need only ten of the bolts, so no need for superfluous rust-stripping on the rest of them. The rest of the hydrant was too heavy to muscle around the bench grinder, hence the drill with wire wheels.


6. Tape off everything you don’t want paint on, like threads.This whole thread assembly, including the base where it meets the body that I didn’t tape off, is brass. It would look great with the new paint job if it were polished and clear-coated. Yeah, too lazy to bother stripping and polishing that up, too.


7. Wash off all the grinding dust and any oil or grease, then prime all the parts. Even if the paint says no primer needed, do it.

8. Paint all the parts. I used Hammerite on the red parts. I don’t know if this kind of Hammerite paint still exists.


And antique brass Rust-Oleum Metallic indoor-outdoor paint on the top and the caps that will cover the holes on the body. The big hole (above photo) is where the spigot will be.

Now we’ll find valves and such to make the whole thing work in part 2.
May 15, 2016 | How to
Part 1 here.
Edit: This is where some steps are missing between parts 1 and 2 (see explanation in part 1), but there’s enough here and in the diagram above for you to get the gist of the project.
A bit of a recap of the missing steps: The cap that comes on old fire hydrants (unscrew cap, screw on fire hose – it looks like the caps on the side of the last picture below, but bigger) is too thick to drill through, so Captain OCD bought a new storz (cap) at a wholesale plumping supplier. Not cheap: about $125 at the time. He drilled a hole in the middle of the very expensive cap, rendering it useless if it didn’t work out. The hole is for the pipe to come out of the hydrant to attach the fittings for the valve. That leaves you with a blank, unthreaded hole, so he used big brass washers (in diagram above) on either side of the front half of the storz (the back half is screwed into the hole where the original cap was), in combination with the brass coupler between the outside of the storz and the valve, to hold the whole valve assembly tight to the storz.
9. Connect the pipe assembly inside the hydrant to the valve assembly on the back of the storz. In tight quarters you’ll be cutting the PVC pipe to the proper length, gluing, and likely questioning the parenthood of the fire hydrant.
10. Turn the water on and check thoroughly for leaks. Fix ’em if you got ’em.
11. When you’ve eliminated any leaks where you’ve glued or screwed things together, fill the hydrant with foam packing peanuts or something similar to insulate against the cold. The hydrant is essentially a cast iron meat locker, where cold air can hang out long enough to crack the pipe and fittings inside of it. While we’ve cracked three valves that are exposed to the air, the pipe inside the hydrant has never cracked due to cold.
12. This is what it looks like all done, with the hose attached. The fittings are wet because the new hose I bought to go with the new fire hydrant was missing a rubber washer. It’s not now. In this picture, you can see how the front half of the storz has those big ears around the edge so you can hit them with something heavy to quickly get it off and attach a fire hose to the back half of the storz.

This is a ball valve, which means you turn it a quarter turn for full-on. I hate those twisty kind that take multiple twists to be fully opened – I have a car to wash; no time for excessive twisting of valve handles. I want the water either on or off, and if I want to control the flow, well, that’s what nozzles are for. Your entirely unnecessary project is turning a fire hydrant into a hose bib: you might as well make it work for you.

13. We’re done. That post with the copper cap on it is where we mounted the hose hanger (it’s waiting for the concrete to set here). It’s not ideal, but it’s the closest we could get it to the hydrant in this location Captain OCD has since repainted (again, near dawn) that top cap to match the body of the hydrant. If I had known what color the storz was going to be (it’s not painted, it came this way), I would have painted the bits I painted brass to more closely match. The top and the side caps come off with a quick twist so I’ll probably paint those to match some day. When there is pork in the treetops.

It looks like the hydrant has been here for years instead of hours because Captain OCD dug those plants (they’re kind of viney, so few roots), set them off to the side, and then replanted and spread them out when he was done. He also dug up enough of those 1-toddler rocks in the 4-foot ditch to the water source to build that little rock wall in front of the hydrant so no one would rip off their leg by walking too close to the valve if the hose weren’t attached.
__________________________________________________
Eight years later, this is what it looks like now:
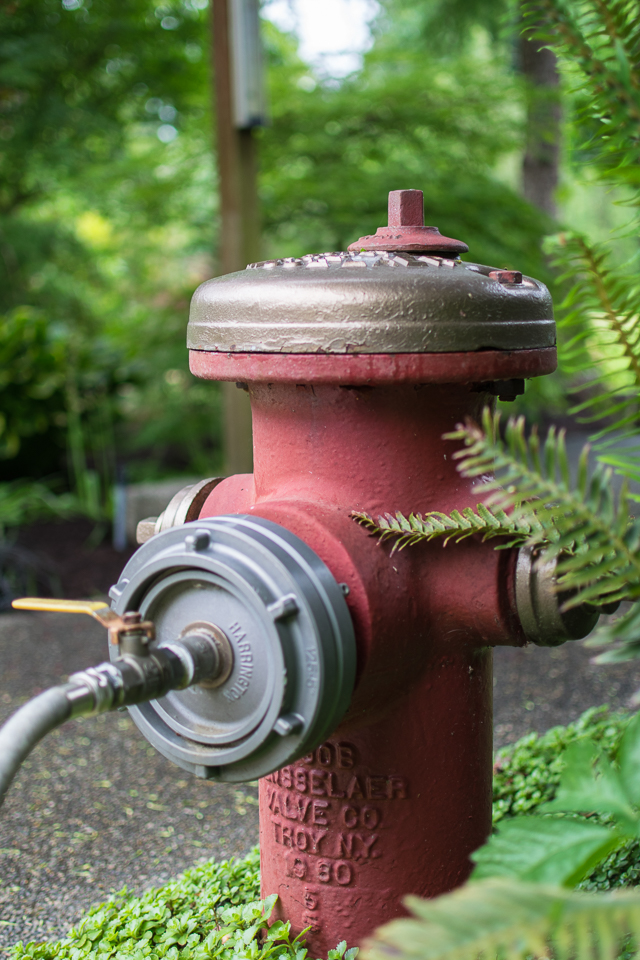
Not as shiny, but not bad. You can see the yellow handle of this valve: It’s yellow because it’s for natural gas. Every time we’ve replaced the valve it’s been difficult to find such a valve for water applications (red handle) in local stores.
Oct 16, 2015 | Daily
I give up on Googling for the best places to take photos in the county and go for a short walk instead.


